
Falling Leaves Collar By Melinda Barnett - Featured In GreenCraft Magazine
My garden hearts were in there as well:

Garden Art Hearts by Melinda Barnett, Featured In GreenCraft Magazine
I really love Stampington magazines, and I feel so honored every time they include my work in one of them. This time I have five projects featured in GreenCraft, so it's like honored times five. My friends Brooke Bock, Frances Peets, and Ella Wilson have work in there too. I'm in such good company!
I've been busy since the last time I blogged. It's amazing that it has only been 10 days. First of all, I made those little houses I was talking about last time. I started with a little red one. Am I too old to have a favorite color? I do have one. It's red.

Little Red House Made From A Cracker Box
I made the template from a vintage one. Super easy. Then I cut the pieces out of a cracker box, hot-glued them together, added sandpaper to the roofs, and painted them with acrylic craft paints. A little Mod Podge, fake snow, and glitter, and they were finished.
I made the tiny trees by taking some hemp rope and cutting it into 1-inch pieces. I twisted green coated 24 GA florists' wire around the pieces(with a little white glue,) dyed them with Ranger peeling paint-colored green distress ink, and trimmed them with scissors. I used a bead cap and some E6000 jewelry glue to make the base and stick it to the platform. The bottle brush tree on the right came with the vintage houses that I used for the pattern, but it didn't have a stand. I used the drill press to make a hole in a game piece, and glued the stem into the new base.
I made a bunch more of them. My Mom would have loved the blue one. Blue was her favorite color.

More Little Houses Made From Cracker Boxes
The One on the left is covered with paper from a book. It has an overgrown moss yard and a yellow Popsicle stick fence. You know. Every neighborhood has a crazy house like this. If it weren't for Mr. Bees, I might be that crazy neighbor, but he keeps our yard looking lovely, makes sure that the Christmas lights come down, all that good stuff that good husbands do.

Cracker box House With Craft Stick Fence
(Janet Loomis from Anvil Artifacts gave me the tree on the left. Thank you again Janet!)
So now I have a whole lineup of little houses, just like my Mom did when I was little!
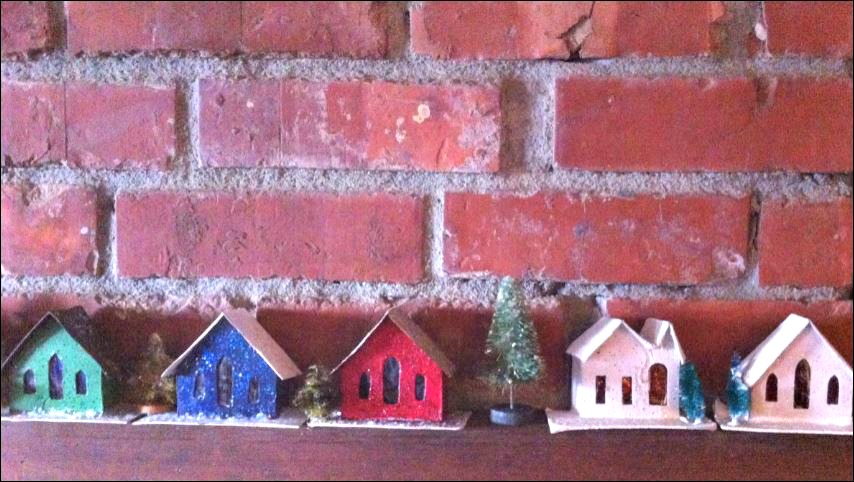
My Lineup Of Handmade Glitter Houses
Ah, but most of the week was not about making Christmas decorations. Most of the week was about making jewelry. This week I was doing a bit of a study in opposites: the hard and the soft, the new and the old, the masculine and the feminine.
Here are the pieces I made. I'm just going to start with this one because it's my favorite. I call it "Sancta Camisa." The actual Sancta Camisa is a relic, a garment in the cathedral at Chartres.

Sancta Camisa Necklace

Sancta Camisa Detail Of Focal Piece

Sancta Camisa Detail Of Chain
I loved making this series because it was truly a study of opposites... the pale, delicate beads with the blackened chain (Jax Pewter Black,) and for some of the other pieces, rough, unfinished beads sit alongside refined, faceted ones.

Sancta Camisa Bracelet
The Sancta Camisa followed the form of most of my "bits and pieces" bracelets, but I used softer colors and then Jaxed it. Something a little different.

Sancta Camisa Earrings
I inherited the white stone beads from my brother's vast collection. I'm finally feeling ready to use some of them. Maybe getting a little bit of my old self back. I keep saying that, but it becomes more and more true all the time. Anyway, I've made earrings in this form before, but this time it was a fun study in contrast... rhinestones, crystal and marble beads meet Jax. Fun stuff.

Counterbalance
I can't tell you how much I messed around with this one. Finally it seemed that making it more simple was the way to go. I had a bunch more stuff hanging off the bottom at first, but it kept feeling wrong to me, so I eliminated the other drops from the dangle. Simplicity. I made the focal bead and the rectangular unfinished clay one in my kiln. The bottom piece is from Scorched Earth. I love Petra and her beads.
I made a couple of more rustic bracelets too. I took some of those inexpensive silver bracelets that you can get on eBay, took them apart, and Jaxed them, sealed them with Dorland's Wax. It's a great way to spruce up pre-made focals. I made the unglazed tube-shaped bead. The others are either from thrift store finds that I dismantled, or from my brother's stash. The green cloth is waxed rayon. I used Dorland's Wax from Jacquard. I got the idea from Marina Rios of Fanciful Devices. Marina has such clever ideas. It worked really well.

Pilgrimage
Here's another bracelet in the same form, but with more color. I like color. The coral-colored piece is from another one of those inexpensive sterling bracelets that I dismantled. The yellow piece is an African trade bead. I made the unglazed rectangular bead. The colorful silk is sari silk remnant ribbon.

Allegory
Mr. Bees showed me how to shrink images down, using my Microsoft works word processor program! Woo hoo! There's no stopping me now. I can shrink anything. I shrank these images down small enough to fit onto Scrabble tiles! I have a whole giant jar of them. Until now I hadn't figured out anything to do with them. Now look what I can do!

Madonna De La Mer
To make the bezels, I cut pieces of tin. Then I used the drill press to pierce only the metal parts. I used teeny Tim Holtz eye screws to hold the whole thing together. The beads are wooden. I painted them on one side with Swellegant Iron Paint, and the other with Martha Stewart metallic gold. Yep, that.s right... M. Diddy Gold! Originally I had two sea urchin spines, but I broke one of them off when I was trying to drill a hole in the top. I had some vintage mussel shell charms, so I used those on the other side, to keep the sea theme consistent. I like asymmetry.
Finally for the jewelry, I made two last pairs of earrings. A few years ago I made a series of goddess pieces for my friend Gayle's art show. I liked the forms, so I brought them back with these:
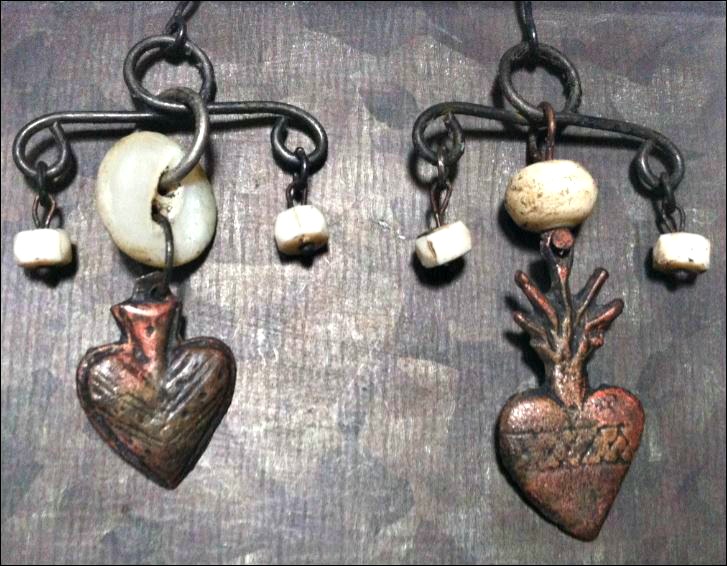
Ex-Voto Suscepto
I used Jax on the milagros, and they turned from silver to a really pretty dark copper color. Sometimes plated metal will do that when the Jax hits it. It was such a nice surprise! The bee on this pair of earrings did the same thing:

Kama Earrings
Again, a juxtaposition of the hard and the soft. Something new for me... most of my pieces are either one or the other.
Finally, I made 5 stamped brass bookmarks with fragments of Rumi poems on them.

People who know me well, know that I don't cry easily. It normally takes a lot to move me to tears. About 10 years ago I met a wonderful woman named Moni Mungin. I was working at Amaryllis, and Moni was staying in the hotel upstairs. We had a lovely conversation. Later that day she came down with a book of Rumi poetry. She said, "I bought this, and I have a feeling that I bought it for you." I was touched, but it took awhile for me to realize that her instincts were dead-on. Upon receiving it, I glanced through the book appreciatively. A few months later, I found myself awake one night (not unusual for me.) I picked up the book and went into the laundry room with it, because our entire house is very open and I didn't want the light to bother Mr. Bees. I started reading the words on those pages and I began to sob uncontrollably, sitting on top of my dryer. Centuries later, Rumi's words were still capable of reaching my soul. So these bookmarks remind me of Moni's great kindness. I'm submitting them to Somerset Life next week.
Right now, in this moment, more than anything else, I feel grateful. Grateful to Devon Warren and Stampington for being so wonderful. Grateful to my husband, my friends, and those talented individuals who, by sharing their work with the world, inspire me every day. Thank you.
Until next time...
Leaving you with this Rumi quote (because you probably can't read the bookmark)
"You are not a drop in the ocean. You are the entire ocean in a drop."


