Tuesday, November 3, 2015

The Entire Ocean In A Drop

A few days ago I received my contributor's copy of GreenCraft magazine. The lovely, sweet editor, Devon Warren, included a number of my projects in this issue, including this necklace:


Falling Leaves Collar By Melinda Barnett - Featured In GreenCraft Magazine


My garden hearts were in there as well:


Garden Art Hearts by Melinda Barnett, Featured In GreenCraft Magazine


I really love Stampington magazines, and I feel so honored every time they include my work in one of them. This time I have five projects featured in GreenCraft, so it's like honored times five. My friends Brooke Bock, Frances Peets, and Ella Wilson have work in there too. I'm in such good company! 

I've been busy since the last time I blogged. It's amazing that it has only been 10 days. First of all, I made those little houses I was talking about last time. I started with a little red one. Am I too old to have a favorite color? I do have one. It's red. 


Little Red House Made From A Cracker Box


I made the template from a vintage one. Super easy. Then I cut the pieces out of a cracker box, hot-glued them together, added sandpaper to the roofs, and painted them with acrylic craft paints. A little Mod Podge, fake snow, and glitter, and they were finished. 

I made the tiny trees by taking some hemp rope and cutting it into 1-inch pieces. I twisted green coated 24 GA florists' wire around the pieces(with a little white glue,) dyed them with Ranger peeling paint-colored green distress ink, and trimmed them with scissors. I used a bead cap and some E6000 jewelry glue to make the base and stick it to the platform. The bottle brush tree on the right came with the vintage houses that I used for the pattern, but it didn't have a stand. I used the drill press to make a hole in a game piece, and glued the stem into the new base. 

I made a bunch more of them. My Mom would have loved the blue one. Blue was her favorite color. 


More Little Houses Made From Cracker Boxes


The One on the left is covered with paper from a book. It has an overgrown moss yard and a yellow Popsicle stick fence. You know. Every neighborhood has a crazy house like this. If it weren't for Mr. Bees, I might be that crazy neighbor, but he keeps our yard looking lovely, makes sure that the Christmas lights come down, all that good stuff that good husbands do. 


Cracker box House With Craft Stick Fence

(Janet Loomis from Anvil Artifacts gave me the tree on the left. Thank you again Janet!)


So now I have a whole lineup of little houses, just like my Mom did when I was little!
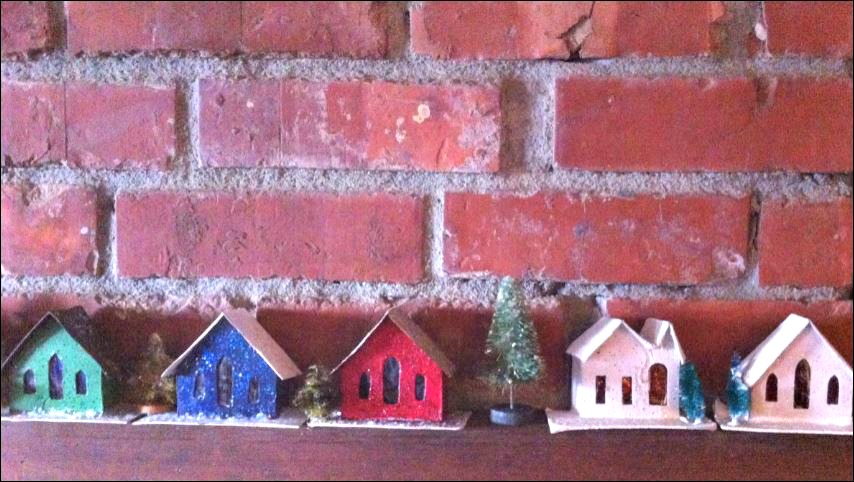


My Lineup Of Handmade Glitter Houses


Ah, but most of the week was not about making Christmas decorations. Most of the week was about making jewelry. This week I was doing a bit of a study in opposites: the hard and the soft, the new and the old, the masculine and the feminine.

Here are the pieces I made. I'm just going to start with this one because it's my favorite. I call it "Sancta Camisa." The actual Sancta Camisa is a relic, a garment in the cathedral at Chartres. 


Sancta Camisa Necklace


Sancta Camisa Detail Of Focal Piece


Sancta Camisa Detail Of Chain


I loved making this series because it was truly a study of opposites... the pale, delicate beads with the blackened chain (Jax Pewter Black,) and for some of the other pieces, rough, unfinished beads sit alongside refined, faceted ones. 


Sancta Camisa Bracelet

The Sancta Camisa followed the form of most of my "bits and pieces" bracelets, but I used softer colors and then Jaxed it. Something a little different. 


Sancta Camisa Earrings

I inherited the white stone beads from my brother's vast collection. I'm finally feeling ready to use some of them. Maybe getting a little bit of my old self back. I keep saying that, but it becomes more and more true all the time. Anyway, I've made earrings in this form before, but this time it was a fun study in contrast... rhinestones, crystal and marble beads meet Jax. Fun stuff. 


Counterbalance

I can't tell you how much I messed around with this one. Finally it seemed that making it more simple was the way to go. I had a bunch more stuff hanging off the bottom at first, but it kept feeling wrong to me, so I eliminated the other drops from the dangle. Simplicity. I made the focal bead and the rectangular unfinished clay one in my kiln. The bottom piece is from Scorched Earth. I love Petra and her beads. 

I made a couple of more rustic bracelets too. I took some of those inexpensive silver bracelets that you can get on eBay, took them apart, and Jaxed them, sealed them with Dorland's Wax. It's a great way to spruce up pre-made focals. I made the unglazed tube-shaped bead. The others are either from thrift store finds that I dismantled, or from my brother's stash. The green cloth is waxed rayon. I used Dorland's Wax from Jacquard. I got the idea from Marina Rios of Fanciful Devices. Marina has such clever ideas. It worked really well. 


Pilgrimage


Here's another bracelet in the same form, but with more color. I like color. The coral-colored piece is from another one of those inexpensive sterling bracelets that I dismantled. The yellow piece is an African trade bead. I made the unglazed rectangular bead. The colorful silk is sari silk remnant ribbon. 


Allegory


Mr. Bees showed me how to shrink images down, using my Microsoft works word processor program! Woo hoo! There's no stopping me now. I can shrink anything. I shrank these images down small enough to fit onto Scrabble tiles! I have a whole giant jar of them. Until now I hadn't figured out anything to do with them. Now look what I can do!


Madonna De La Mer


To make the bezels, I cut pieces of tin. Then I used the drill press to pierce only the metal parts. I used teeny Tim Holtz eye screws to hold the whole thing together. The beads are wooden. I painted them on one side with Swellegant Iron Paint, and the other with Martha Stewart metallic gold. Yep, that.s right... M. Diddy Gold! Originally I had two sea urchin spines, but I broke one of them off when I was trying to drill a hole in the top. I had some vintage mussel shell charms, so I used those on the other side, to keep the sea theme consistent. I like asymmetry. 


Finally for the jewelry, I made two last pairs of earrings. A few years ago I made a series of goddess pieces for my friend Gayle's art show. I liked the forms, so I brought them back with these:
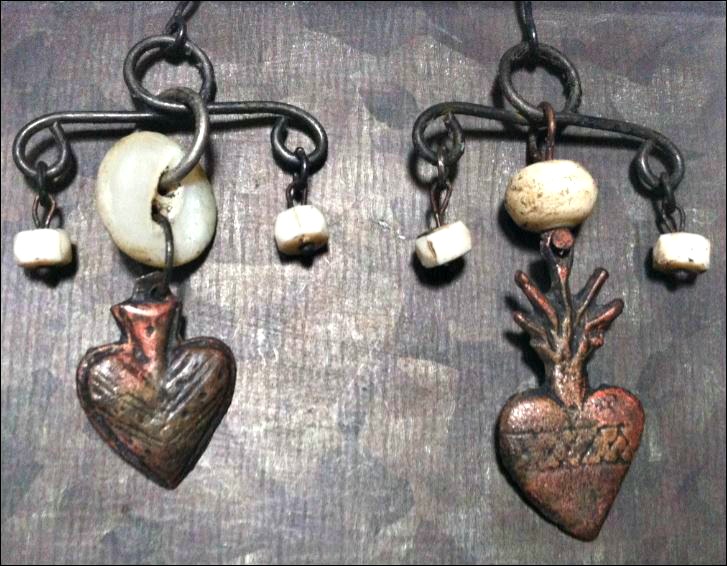


Ex-Voto Suscepto


I used Jax on the milagros, and they turned from silver to a really pretty dark copper color. Sometimes plated metal will do that when the Jax hits it. It was such a nice surprise! The bee on this pair of earrings did the same thing:


Kama Earrings


Again, a juxtaposition of the hard and the soft. Something new for me... most of my pieces are either one or the other. 


Finally, I made 5 stamped brass bookmarks with fragments of Rumi poems on them. 


People who know me well, know that I don't cry easily. It normally takes a lot to move me to tears. About 10 years ago I met a wonderful woman named Moni Mungin. I was working at Amaryllis, and Moni was staying in the hotel upstairs. We had a lovely conversation. Later that day she came down with a book of Rumi poetry. She said, "I bought this, and I have a feeling that I bought it for you." I was touched, but it took awhile for me to realize that her instincts were dead-on. Upon receiving it, I glanced through the book appreciatively. A few months later, I found myself awake one night (not unusual for me.) I picked up the book and went into the laundry room with it, because our entire house is very open and I didn't want the light to bother Mr. Bees. I started reading the words on those pages and I began to sob uncontrollably, sitting on top of my dryer. Centuries later, Rumi's words were still capable of reaching my soul. So these bookmarks remind me of Moni's great kindness. I'm submitting them to Somerset Life next week. 

Right now, in this moment, more than anything else, I feel grateful. Grateful to Devon Warren and Stampington for being so wonderful. Grateful to my husband, my friends, and those talented individuals who, by sharing their work with the world, inspire me every day. Thank you. 

Until next time...

Leaving you with this Rumi quote (because you probably can't read the bookmark)

"You are not a drop in the ocean. You are the entire ocean in a drop."


Friday, October 23, 2015

Labors Of Love

I have been busy the last 10 days, making everything but jewelry. Before I show you what I made, I want to show you what came in the mail. Nope, not jewelry-making supplies this time. What came in the mail was my contributor's copy of Willow & Sage. This is one of my very favorite magazines. I have all the back-issues, and I pour over them again and again, looking for fun gifts to make. I was fortunate enough to have had two articles published in this issue.


First of all, I made these garden herb salt soak vials:


Garden Herb Salt Soak Vials

They are really easy to make... basically you just fill the vials with bath herbs and the salt of your choice, seal the top with string and wax, and make the little copper tags. I explain how to do it in the article. They make great gifts, as do these rice and lavender filled microwavable heat packs:


Rice and Lavender-Filled Microwavable Heat Packs


As I mentioned, both articles are in the autumn issue of Willow & Sage magazine. Up until about 6 months ago, I didn't think I could make anything but jewelry. My good friend Brooke Bock encouraged me to expand my horizons. Now I'm making soaps, doing woodworking projects, making table linens... all kinds of new things. I feel like the whole world of creating has really opened up for me.

Last weekend I did a show at my friend Tracy's new art space in Conway WA, called The Artists' Clubhouse. It was such a pretty little show. I sold some things, and had a really nice time.

Even with the show prep I somehow managed to make some new things, including this jar for my dogs' treats. I have two big spotted dogs, Max and Sparta. Max is a Dalmatian/German Shorthaired Pointer cross, and Sparta is a Catahoula Leopard dog. Sparta hasn't been feeling well. She has some food sensitivities and gets hot spots. I wanted to make her some soothing brown rice pumpkin dog treats, and I thought it would also be nice to make a cute jar to keep them in. I started with a thrift store ginger jar. Because both my dogs are both spotted, I made their treat jar spotted too. 


Hand-Painted Ginger Jar, With Spots


One Side Has Bones Too!


Another View Of My Hand-Painted Dog Treat Jar


Homemade Peanut butter Pumpkin Dog Treats


I filled the jar with homemade peanut butter pumpkin dog treats. I made up the recipe, using other recipes that had worked for me in the past. Here's my version:


HOMEMADE PEANUT BUTTER PUMPKIN DOG TREATS

2 1/2 Cups Brown Rice Flour
2 Eggs
3/4 Cup Pumpkin
2 Tablespoons Peanut Butter
1/2 Teaspoon Salt
Rice Bran

Mix all ingredients together. Chill in refrigerator for an hour. Preheat oven to 350. Roll out dough onto a cutting board, 1/4: thick. Cut out circles with a jelly jar. Sprinkle with rice bran, then press the bran into the tops. Bake in the oven for 40 minutes. Allow to cool before serving.

I'm just going to admit this... they looked really good, so I tasted them. They actually do taste pretty good. My dogs think they are delicious. My husband asked for one in his lunch. No, I didn't give him a dog treat, but I did make him his very own batch of actual cookies, another labor of love.

Inspired by Somerset Home magazine, I also made these jewelry organizers. they hang on the wall and hold about a dozen pairs of earring each.


Jewelry Organizer Made From  A Shadowbox Frame


This One Has Polka Dot Paper Behind The Screening


The Glass From The Frames Has Been Replaced With Screen Material


I had never done a woodworking project before. Lots of faux finishing, but never woodworking, so this was fun. It turns out that I love the tools and the work itself. From there I moved on to making a little shelf, completely from scratch. It looks more like a bathroom shelf, but I like the way the copper tubing worked for the front of it, so I want to make more of these, without the paper and knobs, and use them for spice racks in my kitchen.


Duck Egg Blue Shelf With Graphic 45 Paper And Copper Tubing


Shelf Detail: Right Side


Shelf Detail: Left Side


Shelf Detail: Knobs


Shelf Detail: Copper Tubing


I think the  thing I liked best about this project is that it started with nothing but my imagination. I took some scrap wood that Mr. Bees had in his shop, and used a hand saw to cut the wood to the right dimensions. I drilled the holes, sanded the edges. cut the copper tubing, did the faux-finish, cut the paper to fit the back, and sealed it in place with Mod Podge. There's something really satisfying about using raw materials instead of pre-made components. I experienced that feeling again yesterday when I made a table runner and some place mats from scratch.


Silk Table Runner With Hand-Painted Gold Polka Dots


Silk Place mat With Hand-Painted Gold Polka Dots


The jewelry organizers, shelf, and polka dot table linens are all going to be submitted to Somerset Home magazine. 


MAIL CALL

This week I received some little vintage Japanese putz houses that I won on eBay. Here's one of them:


White Putz House


We had a whole village of these houses when I was growing up. My Mom would set all of them up on the fireplace mantle every Christmas. I've been feeling nostalgic lately. I'm going to use this one as a template. I saved some cardboard from a box of crackers. Hopefully I'll have a little village of my own by the next time I blog!

Until then! Leaving you with this quote:

"Love begins at home, and it is not how much we do... but how much love we put in that action."
-Mother Teresa


Tuesday, October 13, 2015

TEN THINGS IN TEN DAYS

I don't think I actually made one thing a day. Honestly it felt like a lot more, but sure enough, my last post was 10 days ago, and here are the things I made.

In my last post I finished by showing a really simple triple-wrap assemblage necklace that I made from my "bits and pieces" bin. I had a really fun time making it, so I decided to make a few bits and pieces assemblage braclelets.


My Garden Dreams Of Spring


The Heart Of The Matter


The Heart Of Elegance


Catching Fireflies In A Jar


The Copper Promise


Then I made a series of cathedral arch pieces, using reclaimed brass from an old lamp. I worked on each piece for several days.


Bebe Cathedral Arch Bracelet


Cathedral Arch Bracelet, Crocheted, Torched, and Riveted


This photo shows the true color a little better than the other one


Cathedral Arch Series Earrings (made with antique French infant crucifixes)


Detail of Cathedral Arch Necklace


Then finally, I fabricated these 5 bracelets out of copper and brass sheet metal:


The bracelets started out as bangles, but the forms began to bore me to tears, so I cut them apart and started over again! I do that all the time. I have to remind myself that if I just keep working at it, something nice will appear in the end.

I'm already working on projects for next time!

Leaving you with this quote:

"To draw, you must close your eyes and sing." Pablo Picasso said that. I think it's a beautiful quote.

Until next time!

Saturday, October 3, 2015

Shotgun Shell Vessels and Lace & Rhinestone Pendants

This has been a fun week for me. I received my contributor's copies of Belle Armoire Jewelry and Jewelry Affaire. I have work in both of them, which always makes me so happy. Here's one of my two articles in Belle Armoire Jewelry. They always make my work look so much better than I do. I love Stampington.


Belle Armoire Jewelry Autumn 2015


Last week I made some lemon-scented soaps in a thrift store Madeleine pan. This week I designed some simple packaging for them:


Lemon-Scented Shell-Shaped Soap


I used a roll of grass cloth wall paper, some torn lavender-colored cotton cloth strips, and sprigs of lavender from my friend Karen's garden.


I have always admired the cargo vessel necklaces that Lynn Suprock made for Belle Armoire Jewelry a few years ago. She used shotgun shells and some sort of glass or plastic tubing. Last week my friend Brooke Bock made some in her own style, and did a post on her blog http://artisticendeavor101.blogspot.com/. Inspired by both of these talented artists, I decided I needed to join in on the fun. First I tried plastic dime-sized coin holders, but they didn't fit into the caps. Neither did any of the glass vials that I have in my vast collection. As luck would have it, Mr. Bees was doing a project last week, using some plastic tubing. He had about a foot of it leftover. Eyeing it, I thought it might just work. It turned out to be the perfect size!


Shotgun Shells And Plastic Tubing


I filled some of them with tiny seashells and micro glass beads. Others were filled with dried rose petals. I enjoyed making them so much that I became a tad obsessed. I made 8 of them.

With that project finished, I decided to try my hand at a technique borrowed from yet another talented artist, Becky Shander. I have long admired her lace and rhinestone pendants. Reading her description, she used the eye parts from hook-and-eye fasteners. I didn't have any of those available, so I manufactured reasonable facsimiles using round-nose and needle nose pliers, and reclaimed steel anchor wire. Mine ended up being quite a bit bigger than hers, so to give them a bit more body and structure, I glued pieces of suede onto the backs, letting some of it show from the front. this is a great way to use bits of scrap lace and vintage rhinestone dress and shoe clips!


Lace and Scarf Clip Necklace


After finishing those necklaces, I gave myself a challenge. I have a huge problem, and I mean HUGE problem, putting things away. I always have little trays of things that I set aside, thinking I am going to make something with them. I need to remember that I usually start fresh every day, but I rarely remember that. Instead of being sorted back into their proper bins, my beads and components end up getting dumped into trays. From there I dump them into a train case that I have beside my work table. They can sit in there for months. I decided to go into that train case and pull out things with similar color and feel to them. I made this triple-wrap assemblage necklace from my train case components:


I Love You More Than Tongue Can Tell


I loved making chain from my train case beads and findings. It felt like I was recycling. 

So changing the subject a bit, I want to talk about my Christmas tree. I know, I know, it's way to early to talk about Christmas. Or is it? 

I've been collecting vintage ornaments for years. I really want to make my own tree this year, a big one. That's why I'm starting early. Mr. Bees has pledged his help, which is a good thing, because I am thinking I might ask him to weld parts of it for me. I feel  comfortable with the small spot welder, so I can make the branches myself, but I might need help with the superstructure.

Anyway, in anticipation of my handmade tree, I bought myself a small group of vintage ornaments this week, to add to my collection. 


Vintage Christmas Ornaments

So that's my idea. I have two months to design and fabricate a tree. I haven't decorated a tree for 4 years. I'm excited about the idea, so I thought I would share it. I'll post photos of the progress.

Until next time, leaving you with this quote:

"...freshly cut Christmas trees, smelling of stars and snow and pine resin - inhale deeply and fill your soul with wintry night." 
-John Geddes, A Familiar Rain