Thursday, September 17, 2015

Sweet Simple Things

It was one of those weeks... a weather change week, a 3-day migraine week. I know better. My migraine trigger is orange juice. I had some. It was a silly thing to do. Somehow I still managed to make some simple little things though.

To start the week off, I made two more necklaces with those resin-filled heart components I finished two weeks ago:


This one has bachelor button and marigold petals...


...and this one has bachelor button and California poppy petals.


 Next I made these simple fragrant lavender melt & pour soaps, in my handmade molds:


I used a white shea butter melt-and-pour base. It's super easy to use.
The faint purple color is from purple Brazilian clay from brambleberry.com. 

Here's the recipe for this one:
Rustic Melt & Pour Lavender Soap:

2 lbs white melt-and-pour soap base. (I used Bramble Berry's shea butter base.)
1 Tablespoon purple Brazillian clay
5 Tablespoons lavender oil for strongly scented soap 
- or
2 Tablespoons lavender oil for milder scented soap
2 teaspoons coconut oil

In addition, you will need:

A microwave-safe container with a pour spout.
Measuring spoons 
A long-handled plastic spoon for stirring
Soap molds or a clean rectangular milk cartons
A knife 
Olive oil spray


Spray your molds with olive oil spray. Cut the base into 1/2-inch cubes. Put into a microwave safe bowl with a pour spout. Microwave in 10-second bursts until the base is completely melted. Add the lavender and coconut oils. Stir in the clay. Stir until all the clay appears to be dissolved. Pour into soap molds or a milk carton. Allow to harden. (I cheat and put mine in the freezer for an hour.)Unmold and trim with a sharp knife, if necessary. 

For a less rustic look, suspend your clay in 1 Tablespoon of rubbing alcohol, mixing them together well before adding them to the hot soap base mixture. This will help prevent the clay from settling into the faces of the molds.


Next I made these simple vintage assemblage bracelets:


"Pain, Protection, and Pride"
Repurposed thistle pin. Black rosary chain, 


"Was Always You"
Vintage brass stamping. Vintage pearls.


"Interior Truths of Faith"
Vintage copper finding. Handmade pearl chain, Vintage bar chain, Vintage charms, 


"Flight Of Prayer"
Vintage Pegasus stamping. Vintage chain.


Here's what I am photographing these bracelets on.


"Speak Softly"
Vintage brass religious medallion. Vintage pink doll button. Vintage chain.


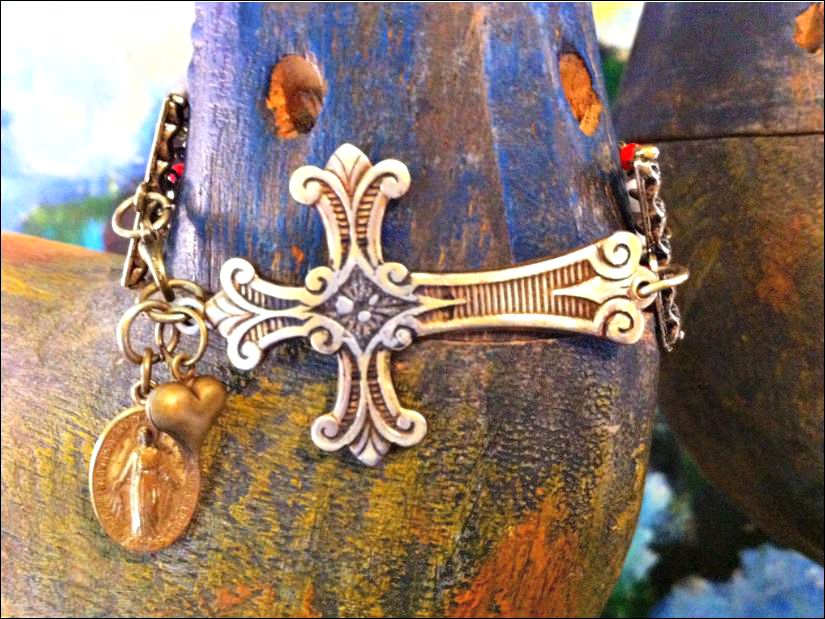
"The Symbols Remain"
Vintage cross. Vintage beads. Vintage religious medallion.


Here's a better shot of the vintage chain I used for the cross bracelet.


"Aristaeus" (The Greek God Of Beekeeping)
Vintage chain. Vintage bee charm. Greek Flourish.


"Tears Of Ra"
Vintage Bee Charms. Vintage chain. Vintage flower charm.


Here's another view of the same bracelet. 


"By Candlelight"
Antique brass pattern sheet. Vintage shell charm. Vintage chain.


"The New Alchemy"
Vintage belt piece. Vintage earrings. Vintage chain.


Clasp view.


 I love making these multi-strand bracelets. It's the the perfect thing to do on a rainy afternoon. Like soapmaking, I find the process both addictive and meditative.


I have some experiments planned for next week. Wish me luck! Until then, leaving you with this quote:

"I am beginning to see that it is the sweet, simple things of life that are the real ones after all."
-Laura Ingalls Wilder 


Wednesday, September 9, 2015

Unintended Magic

Some weeks it seems like I accomplish more than others. Part of my problem is that I tend to define success by how many projects hit the workbench completed. Even if I started them months ago, completing 10 or more projects in a week feels like success. Of course it can't always be like that. Life gets in the way of my art. Sometimes fun happens too.

While it felt like I was working really hard this week, not that much hit the bench finished.

I started off my week doing one of my very favorite things on earth: hanging an art show! My friend Lisa Rhoades makes beautiful art nests and has a month-long solo show in the art bar at the Lincoln Theater in downtown Mount Vernon. She had some wonderful ideas for her display and needed a second set of hands to make her visions a reality. Here are her kitchen nests, hung from a wonderful tangle of chicken wire:


The Lincoln Theater was constructed in 1926, as a vaudeville and silent movie house. It has recently been completely remodeled. The space is really intimate and beautiful, with lots of little nooks and crannies to tuck away branches and small pieces of art. 


The lighting was wonderful, and her pieces left the most fabulous shadows on the walls.


When we were finished, we both became entranced by the shadows and started taking photos. The shadows themselves became a kind of installation artwork, a kind of unintended magic.


The next day I decided to make a little magic of my own, I love the way light looks when it hits glass. I made some pretty glass potpourri, 9 different kinds. 

 I have friends who work in glass, both stained glass and glass blowing. They give me some of their broken scraps, and I've been saving them for years, along with my own broken drinking glasses. I decided it was time to put them to good use. This combination is called "Tropical Fruit."


This one is called "Clear Blue Sky."


...and this one is called "Christmas Candy."


I made some sheer bags for them to go in, to keep the scents separated
.


I finished the necklace I posted last week. I decided it needed a little more color, so I added a ribbon that matched the bachelor button flowers inside.


I must have been in a heart-making mood. I finished these four necklaces too. The hearts are made from recycled aluminum roof flashing. I ran it through my Epic 6 to get the patterns. 


I continue to be obsessed with soap-making! A few weeks ago I made my own soap molds, using dish soap, water, and silicone caulk. The combination makes really rustic molds. This one has an elephant motif.


I used my DIY soap molds to make more rustic melt-and-pour soap bars. These have cinnamon and clay in the recipe, and smell like almond cookies! 


I also worked out the packaging for the rose eye gel serum...


and the packaging for my hot-process crockpot soaps.


Somehow, in the middle of all of this week, which felt so busy, I also spent an entire day at thrift stores, where I found, among other things, these great beads:


...and finally, saving the best for last, Mr. Bees and I went to a metal recycling place, where I found this 13 and a half pound roll of 26 gauge brass sheet! They said it had been there "forever." 


So that was my week! It felt busy, but I really only completed 8 projects. Next week is all about writing. The submission deadlines for both GreenCraft magazine and Willow & Sage are coming up in 6 days, so I need to get moving on the articles!

Until then... leaving you with this quote:

"I surrender the idea of having some kind of control over the arc of my career a lot of the time, because you never know what tomorrow is going to bring."
-Wentworth Miller


Wednesday, September 2, 2015

September Is Here!

September is my favorite month... summer is winding down, the air is getting crisp. I also like the fact that it is the end of show season. I had my last show over the weekend. It was at the Bellevue Botanical Gardens, a beautiful setting, filled with lovely plants and people.

Besides getting ready for the event, I did manage to finish some projects this week.

First of all, I made these bracelets from bits of scrap ribbon, baling wire, and upcycled beads.


Then I took some scrap leather and made this bracelet:


I used a sharp pair of scissors to cut channels out of the leather, then punched some holes and inserted silver plated jump rings. The clasp is magnetic.


I also finished this colorful bath mat. It's crocheted denim yarn, made from a few pairs of my old jeans. I tied sari silk and other ribbon scraps to it.


I fixed most of those soldered white heart components that I started last week too:


I made one necklace from one of the hearts:


...and finally, I formulated an amazing rose-scented eye gel. I bought the ingredients, heated them up, and poured them into tiny tins. I'll have the packaging finished this week.


Despite doing the show, I still feel like I accomplished a fair amount this week. I'm sending some of these projects to GreenCraft magazine for publication consideration. The rose eye cream will be submitted to Willow & Sage.

Of all the things that happened this week, my favorite was holding a little bird that hit the window, keeping him safe from eagles and neighborhood dogs until he was well enough to fly off. For me, it's the little things that make life magical.

Until next week!

Leaving you with this quote:

"The air is crowded with birds - beautiful, tender, intelligent birds - to whom life is a song."
-George Henry Lewes


Wednesday, August 26, 2015

MY FIRST WORKBENCH WEDNESDAY!

First of all, I wanted to thank Paulette for her kind words, and Vicky for following me!

This post is really about how I spend a typical week. My friend Brooke Bock of Artistic Endeavors 101 is a true inspiration to me in so many ways. She has this fabulous thing she does every Wednesday. She calls it "Workbench Wednesday," and she shows all the things she has on her workbench for the week.

Here's a link to her wonderful blog:

http://www.artisticendeavor101.blogspot.com/

I asked Brooke if she would mind if I adopted this practice, and in true Brooke Bock fashion, she encouraged me to take up her practice. So this is it... my first official Workbench Wednesday, a glimpse into what I've been working on this week.

First of all, here's the jewelry I made. The first piece is a stamped solder bracelet with faceted vintage crystals. I have to admit, the stamping does not always go smoothly. It takes lots of torching, cooling, and re-torching to get it to work out. This one took four separate torching and stamping sessions. When I was finally finished, I dipped it in Jax Pewter Black, used 0000 steel wool on the surface, touched a bit of gold Gilders Paste to the high spots, and then finally sealed it with Dorland's Wax.


I have a bunch of other stamped pieces ready to go now too. I started working on one, and found that the focal piece just didn't work. That happens sometimes. The bracelet really wanted to be finished differently than I had envisioned, so I ended up with this:


I have always liked the look of a cross worn sideways on a bracelet, and I wanted to make my own version. I used nylon-jawed bracelet-forming pliers to bend the vintage Italian crucifix. The chain is handmade... silver plated copper wire and faux vintage pearls. I dipped this chain in Jax Pewter Black too. I'm a little bit of a Jax junkie.

The two bracelets look nice when worn together.

The other thing that happened this week is that Stampington's Holidays & Celebrations magazine came out, at least I got my advanced contributor's copy. The issue should hit the news stands on September 1st. It's a really pretty issue. I feel fortunate to have my ornaments in there. Here's what they look like:


I used vintage flat-backed chandelier crystals and Grachic 45 paper to give them a really vintage feel.


It sounds strange, but I was oddly inspired by my own article. They always make my work look so much better than I ever could. Anyway this week I decided to make a few more ornaments, this time with a pinecone motif.:


I found the image in an old book about identifying trees. Mr. Bees was a forestry major in collage, and I knew he would have something like that hanging around the house. Of course his first words to me were, "You're not going to cut it up are you?" Nope. I photocopied it. Next I used a watered down solution of Ranger "Vintage Photo" Distress Ink on the paper, and then used Mod Podge to adhere the image to the crystal.

For a change of pace, I also made some melt-and-pour soap this week. I made my own silicone molds, using silicone caulk and dish soap. I colored the soap with food coloring and clay (yep, real clay, the kind I use in my kiln.) The results were really rustic.


The clay settled at the bottom of the molds, highlighting the details. I love surprises like that.


I write articles for a lot of Stampington publications. I love Stampington. I fell in love with the magazines years ago. I began with a few articles in Belle Armoire Jewelry, and since then I've been in Jewelry Affaire, GreenCraft, Holidays & Celebrations, and Somerset Studio. A few months ago I bought my first copy of Willow & Sage. If you are not familiar with this magazine, it is the most fabulous DIY  homemade bath and body publication you could even imagine. My first thought was, "Well why not make some bath products too? Three words apply here: Can of worms.

Now I'm hooked on making bath products. I have two articles that will be appearing in the upcoming issue of Willow & Sage, and I am making several experimental batches of crockpot soap every week. Here's a batch of  hot process Beeswax Honey soap I made over the weekend. I have it drying in my dining room.


I got the honeycomb effect by putting bubble wrap on top of the mold as the bars cured.

Now that I have tried using homemade crockpot soap, I will never be able to go back to using store-bought soap again.

I would be remiss if I didn't show you what I am currently struggling with. A few weeks ago I soldered some copper hearts. I then spray painted them white. The idea was that I would fill them with flower petals. I should also say that I grew the flowers from seeds, pressed the petals, and then sealed them with spray sealant. The idea was to preserve them in Ice Resin. Normally I use blue painter's tape on the backs of open bezels, but I decided to cut corners and use clear mailing tape. It didn't work, and I had a nasty runny resin mess all over everything. I flipped the bezels over and taped the tops, wiping the excess resin off the sides of the bezels. I have to figure out how to finish them. Some will get resin and some will get polymer clay. Here's their current state:


They are completely fixable, but need a little work. I look at it this way... if everything is going completely smoothly, I'm not pushing myself. If I'm hitting snags, then I'm still learning, which is such a good thing.

Well, looking back, this week was about Christmas ornaments, new jewelry processes, fixing mistakes, and making my first batches of soap. Next week, who knows!

Leaving you with this quote:

"Good judgement comes from experience, and experience comes from bad judgement."
-Rita Mae Brown